StableGrip™ Vitreoretinal Handle
ET8198H
INTRAOCULAR INSTRUMENT
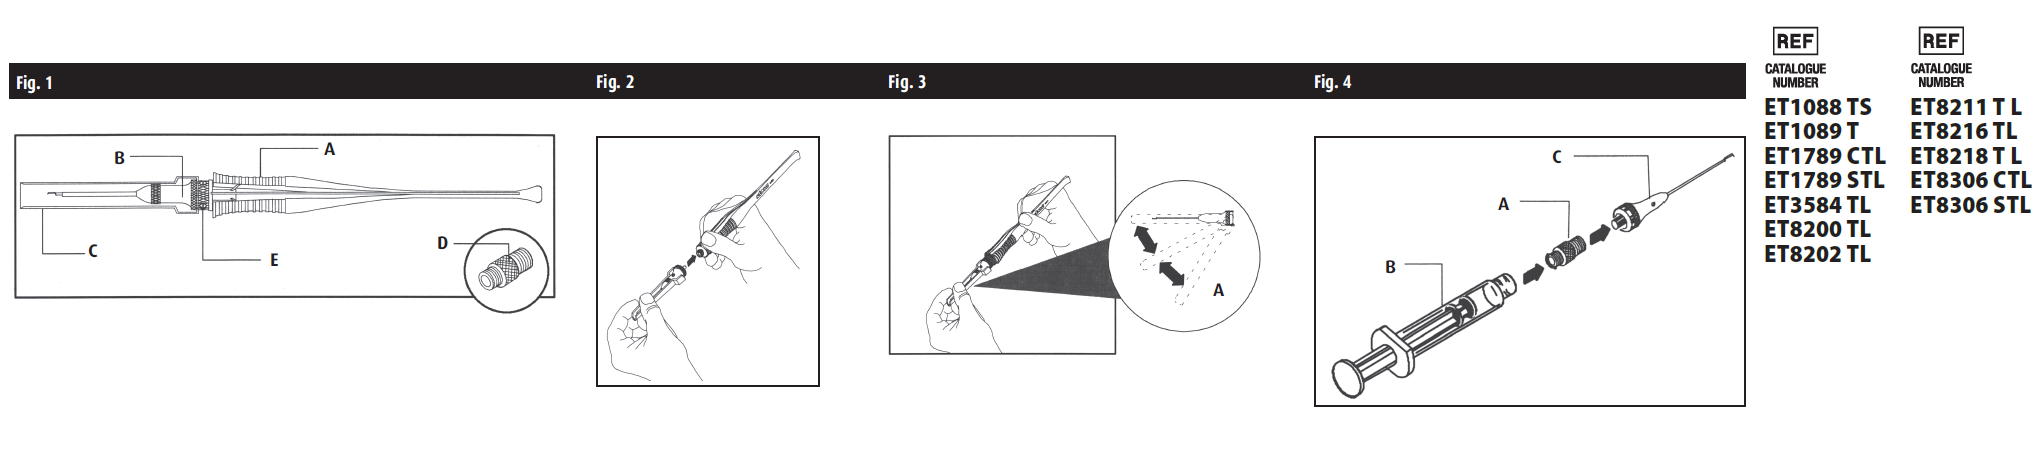
The Intraocular Instrument System is designed for posterior ophthalmic surgery. The system (Refer to Fig. 1) consists of a handle (A), a selection of color-coded tips (B), a plastic tip guard (C), and a cleaning adapter (D). The handle features a rotation knob (E) which allows the tip to be conveniently adjusted into optimal alignment. The actuation mechanism locks the tip position as it actuates the tip.
NOTE: Tip is only intended to be used with the ET8198H.
PREPARATION FOR USE
- Refer to Fig. 2-Installation of tip. With the plastic protective tip guard in place, hold the rotation knob firmly to stop rotation and securely attach the tip to the handle by threading the tip clockwise onto the handle.
- Refer to Fig. 3-Removing/replacing plastic protective tip guard. Remove the plastic protective tip guard (A) by grasping the guard at the tip end and pulling it downward from the tip toward the handle.
DISASSEMBLY OF INSTRUMENT
Hold the rotation knob firmly to stop rotation of the handle, and unscrew the tip by turning counterclockwise, being careful to protect the tip from damage.
CLEANING INSTRUCTIONS
- Remove blood, saline, tissue, and other contaminants immediately by rinsing with warm (between 30º to 40ºC [85º to 105ºF]) distilled or deionized water. Tissue and other residue can be gently removed using an instrument cloth or sponge.
- Rise instrument thoroughly with warm (between 30º to 40ºC [85º to 105ºF]) distilled or deionized water.
- Disassemble the instrument tip to flush out tip.
- Fill a 60cc syringe with warm distilled or deionized water.
- Refer to Fig. 4-Using cleaning adapter. Secure the cleaning adapter (A) onto the Luer connector of the syringe (B) and screw the instrument tip (C) onto the cleaning adapter.
- Force water through the tip, being careful to never draw fluid into the tip. Repeat process as needed.
- Repeat steps D through F once.
- Dry the instrument tip and handle thoroughly with forced air.
STERILIZATION INSTRUCTIONS
Note: Remove tip protector prior to sterilization.
- Standard Gravity Steam Sterilization (Preferred Method): Place the handpiece and instrument tip in a clean open tray, wrapped. Sterilize 30 minutes at 121ºC (250ºF).
- Flash Sterilization: Place the unwrapped but covered handpiece and instrument tip in a clean open tray. Sterilize for 10 minutes at 132ºC (270ºF).
- High Vacuum (Pre-Vacuum) Sterilization: Place the wrapped handpiece and instrument tip in a clean open tray. Sterilize for a minimum of 3 minutes at 134º to 137ºC (273º to 278ºF).
Refer to AAMI ST79:2006 and your institution's policies regarding restrictions on the use of flash sterilization.
CAUTION: Allow the instrument assembly to cool at least 20 minutes before handling.
STORAGE INSTRUCTIONS
Replace the plastic tip guard by pressing the back end first onto the knurled portion of the tip and then carefully securing the protective guard onto the tip.
MANUFACTURER CONTACT
Bausch & Lomb Incorporated
1400 North Goodman Street
Rochester, NY 14609 USA

AUTHORIZED REPRESENTATIVE IN THE EUROPEAN COMMUNITY
Bausch & Lomb GmbH
Brunsbütteler Damm 165-173
1351 Berlin, Germany 
Manufactured By:
Bausch & Lomb Incorporated
499 Sovereign Ct.
Manchester, MO 63011 USA
Storz is a trademark of Bausch & Lomb Incorporated. All other products/brand names and/or logos are trademarks of the respective owners.
© 2019 Bausch & Lomb Incorporated
039005415/4041704
Rev. 2019-10